


Best Lightroom Presets for Real Estate Photography in 2026
Professional presets that deliver clean, bright, and market-ready property images — tested by a working real estate photographer in the GTA.
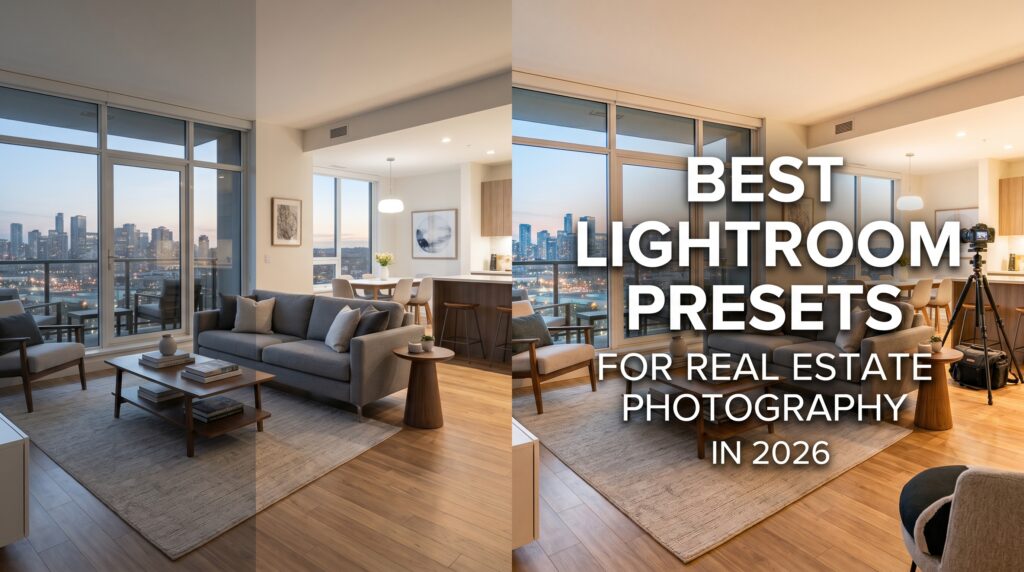
The best Lightroom presets for real estate photography in 2026 do one thing above everything else: they make properties look their absolute best without looking fake. Overly HDR, oversaturated, or artificially brightened real estate photos are immediately recognizable to buyers — and they erode trust in the listing before anyone walks through the door.
After shooting hundreds of properties across the Greater Toronto Area — from downtown condos to suburban family homes — the editing requirements for real estate photography are clear: clean whites, natural light, corrected verticals, and consistent color across every room in the property. The right Lightroom preset makes all of this achievable in seconds per image.
In this guide, you’ll find the best Lightroom presets for real estate photography in 2026, what makes each one work for property images specifically, and the complete editing workflow professional real estate photographers use to deliver market-ready galleries fast.
Unlike portrait or wedding presets — which prioritize mood and emotion — real estate presets must prioritize accuracy and clarity. A great real estate preset brightens shadows without blowing out windows, corrects white balance for mixed artificial and natural light, and enhances architectural details without introducing artificial warmth or color casts.
What to Look for in Real Estate Lightroom Presets
Not every Lightroom preset is suitable for real estate photography. Many portrait and landscape presets add heavy color grading, film grain, or strong vignettes that look completely wrong on architectural and interior images. Here’s exactly what separates a great real estate preset from one that will make your listings look unprofessional:
Balanced Exposure Recovery
The single biggest technical challenge in real estate photography is mixed exposure — a room that looks bright and inviting to the human eye will often be rendered as either a dark interior with bright blown-out windows, or a properly exposed interior with completely white windows. The best real estate presets address this by lifting shadows and recovering highlights simultaneously, creating balanced exposures that feel natural rather than HDR-processed.
Neutral White Balance
Interior spaces typically contain multiple light sources: warm incandescent or LED bulbs from fixtures, cool daylight from windows, and everything in between. A real estate preset should apply a neutral, slightly cool white balance correction that works across these mixed sources without making walls look yellow, skin tones look orange, or whites look blue.
Vertical and Horizontal Consistency
Real estate presets should not apply strong horizontal or vertical color splits. Gradient filters that darken skies work for landscape photography but look bizarre on property exteriors. Your preset should apply global adjustments only — leaving local corrections to be done manually per image.
Clarity and Texture Enhancement
Buyers want to see the quality of finishes — the texture of wood floors, the sheen of countertops, the detail in architectural trim. A modest clarity boost of +10 to +20 in the preset helps reveal these details without making the image look over-sharpened or artificial.
Window Pull Compatibility
The best real estate presets are designed to work as a base for a window pull composite — where the interior exposure and a correctly exposed window view are blended together in Lightroom or Photoshop. The preset should not over-process the image in ways that complicate this blending step.
Top 7 Lightroom Presets for Real Estate Photography 2026
This is the preset pack built by and for professional real estate photographers working in the North American market. Unlike generic presets adapted from landscape or portrait styles, every setting in this pack was dialed in on actual property shoots — from dark basement suites to bright open-plan living areas flooded with natural light.
The pack includes 8 variations covering the most common real estate shooting scenarios: bright daytime interiors, overcast exterior shots, twilight/dusk exterior photography, basement and low-light rooms, luxury property hero shots, and bathroom and kitchen detail close-ups.
- Balanced shadow lift without blowing highlights — the core challenge in real estate
- Neutral white balance calibrated for mixed artificial and natural light sources
- Subtle clarity boost that reveals architectural details and finish quality
- Designed to work with window pull compositing workflows
- Includes both .XMP (Lightroom Classic) and .DNG (Lightroom Mobile) formats
The “clean and bright” look is the most requested style in residential real estate photography. Buyers respond to images that feel open, light-filled, and move-in ready. This preset achieves that look by lifting the exposure, raising whites, recovering shadows, and applying a very slight cool-neutral color grade that feels fresh without feeling processed.
It works particularly well on kitchens, bathrooms, and living spaces with light-colored walls and flooring — the most photographed rooms in any property listing.
- Lifts midtones and shadows while preserving highlight detail in windows
- Slight cool shift eliminates warm color cast from indoor lighting
- Works on both wide-angle and detail/close-up shots
- Minimal adjustments needed after application — fast workflow
High-end luxury properties require a different visual language than standard residential listings. Instead of the clean-and-bright approach, luxury real estate photography benefits from richer tones, deeper contrast, and a warmer, more editorial feel — closer to an architectural magazine than an MLS listing.
This preset collection applies a subtle warm grade with enhanced contrast and slightly deeper shadows — making wood finishes, stone countertops, and architectural details look genuinely premium. Used on properties with high-quality finishes, the results are striking.
- Warm, rich tones that enhance wood, stone, and high-end material finishes
- Slightly deeper shadows for a more editorial, architectural magazine aesthetic
- Increased micro-contrast to reveal surface quality and texture
- Includes a separate “twilight” variation for exterior dusk shots
The exterior hero shot — particularly the twilight or “blue hour” shot — is the single most impactful image in any real estate listing. It’s the image that appears as the primary photo, the one that makes a buyer click through to see more. This preset is engineered specifically for that image.
For daytime exteriors, it enhances sky drama, lifts shadow detail in the facade, and adds a slight pop to landscaping greens. For twilight shots, it balances the warm interior light glowing through windows against the cool blue of the dusk sky — the defining characteristic of a great twilight real estate photograph.
- Balances warm window glow against cool blue-hour sky tones
- Lifts shadow detail in building facades without washing out
- Enhances sky contrast for daytime exterior hero shots
- Boosts landscaping greens subtly for a well-maintained appearance
Basements, windowless bathrooms, home theaters, and underground parking — these are the images that every real estate photographer dreads. Without natural light, these spaces photograph dark, uninviting, and noisy. The Low-Light Interior Preset is designed specifically to rescue these images.
It applies aggressive shadow lifting, noise reduction optimization settings, careful color balance correction for artificial light sources, and a slight warmth boost that makes below-grade or windowless spaces feel inhabitable rather than dingy.
- Aggressive but natural-looking shadow lift for very dark interiors
- Warm white balance correction for yellow incandescent light sources
- Detail sharpening to compensate for high-ISO noise in low-light rooms
- Works alongside Lightroom’s AI Denoise for maximum noise reduction
Drone photography has become a standard deliverable in real estate photography — particularly for properties with large lots, distinctive roof lines, proximity to water or parks, or locations that benefit from context (nearby amenities, neighborhood character). Aerial shots require a completely different preset approach from ground-level interiors.
This preset enhances the richness of aerial images: deeper sky blues, more vibrant landscaping greens, enhanced roof and property boundary definition, and a slight contrast boost that helps the subject property stand out clearly from its surroundings.
- Enhanced blue channel for richer, more saturated sky tones
- Green channel boost for landscaping, lawns, and surrounding nature
- Slight contrast increase to define property boundaries clearly
- Compatible with DJI, Autel, and Skydio RAW image files
For photographers who want a complete real estate editing solution without buying multiple packs separately, the Complete Real Estate Preset Bundle covers every shooting scenario in one purchase — interiors, exteriors, twilight, drone, low-light, luxury, and detail shots.
This is the bundle working real estate photographers install once and use on every shoot — knowing they have the right preset ready for whatever the property presents, no matter the time of day, light quality, or property type.
- Covers interior, exterior, twilight, drone, low-light, and luxury scenarios
- Both .XMP and .DNG formats included for desktop and mobile use
- Includes Photoshop action for sky replacement and window pull
- Commercial license — use on all client work with no restrictions
- Free updates when new presets are added to the collection
The best Lightroom presets for real estate photography are not a finished product — they are a starting point. Every property has different light, different color temperatures, and different exposure challenges. A professional workflow applies the preset first, then makes 2–4 manual adjustments per image to account for the specific conditions of that shoot.
Quick Comparison Table
| Preset | Best For | Twilight Version | Drone Compatible | Mobile DNG |
|---|---|---|---|---|
| Camegraphy RE Pack | All property types | ✓ | ✓ | ✓ |
| Clean & Bright Interior | Kitchens, living rooms | ✗ | ✗ | ✓ |
| Luxury Collection | High-end properties | ✓ | ✗ | ✓ |
| Exterior & Twilight | Hero exterior shots | ✓ | ✓ | ✓ |
| Low-Light Interior | Basements, dark rooms | ✗ | ✗ | ✓ |
| Aerial Preset | Drone overview shots | ✗ | ✓ | ✓ |
| Complete Bundle | All scenarios | ✓ | ✓ | ✓ |
Real Estate Editing Workflow — Step by Step
Having the right presets is only half the equation. Here’s the complete editing workflow professional real estate photographers use to go from raw files to a delivered gallery efficiently:
Import all images into Lightroom and organize them into collections by room — exterior, entrance, kitchen, living, bedrooms, bathrooms, basement, drone. This makes batch processing faster and more accurate.
For each room or angle, flag the single best shot — the one with the most natural light, best composition, and fewest shooting artifacts. Real estate galleries typically deliver 25–45 images total from a standard residential property.
Before applying any preset, go to Lens Corrections and enable Remove Chromatic Aberration and Enable Profile Corrections. Then go to the Transform panel and apply Auto upright correction or manually correct vertical distortion. This is non-negotiable in architectural photography.
Apply the preset most suited to each room type. Use the Clean & Bright preset for main living areas, the Low-Light preset for basement shots, the Exterior preset for facade images, and the Twilight preset for your dusk hero shot.
After the preset, make individual adjustments: tweak exposure by ±0.5EV if needed, fine-tune white balance to correct for the specific artificial lights in that room, and recover any blown highlights using the Highlights slider.
For images with blown-out windows where the view matters, use Lightroom’s Masking tool → Select Sky to create a mask on the windows, then reduce highlights and exposure specifically on that masked area. For more complex compositing, open in Photoshop.
Export as JPEG at 90–95% quality, sRGB color space, with long edge set to 3000px for web delivery or maximum size for print. Deliver via your client portal or a cloud sharing link within the agreed turnaround time.
Pro Tips for Better Real Estate Photography
The best exterior real estate shots happen in the 30–60 minutes before sunset. The warm, directional light eliminates harsh midday shadows, adds dimension to architectural details, and gives the property a welcoming, aspirational quality that flat overcast light cannot achieve.
Before shooting any interior, turn on every light source in the room — ceiling fixtures, lamps, under-cabinet lighting, everything. This fills dark corners, reduces the contrast range you need to manage, and makes the space feel more inviting and livable to buyers.
Real estate photography is almost exclusively shot with a wide-angle lens — typically 16–24mm on a full-frame camera. This makes rooms appear larger and more spacious. Always correct lens distortion in Lightroom before editing, and use the Transform tools to ensure vertical lines are perfectly straight.
Shoot 3–5 bracketed exposures (typically -2, -1, 0, +1, +2 stops) for every interior shot. This gives you the material to create perfect window pulls, ensures you can recover any over or underexposed areas, and provides insurance against challenging lighting situations.
The best real estate images start before you lift the camera. Remove personal items, straighten cushions, clear countertops, open blinds, and position furniture for the most spacious-looking composition. Five minutes of staging saves thirty minutes of editing.
Drone photography is now expected — not optional — for property listings above a certain price point in most markets. Aerial shots provide context, show lot size and landscaping, highlight proximity to desirable amenities, and give listings a professional completeness that ground-level photos alone cannot deliver.
Frequently Asked Questions
The best Lightroom presets for real estate photography in 2026 are those designed specifically for architectural and interior photography — not generic portrait or landscape presets. Look for presets that balance exposure between interiors and windows, apply neutral white balance correction for mixed light sources, add a modest clarity boost, and leave room for individual per-image adjustments. The Camegraphy Real Estate Preset Pack was built specifically for these requirements by a working real estate photographer in the GTA.
The most effective approach in Lightroom is to use the Masking tool to select the windows specifically (Select Sky or a manual Brush mask), then reduce the Highlights, Whites, and Exposure sliders on that mask only. For more complex window pull compositing — particularly where you want to show the view through the window — you’ll need to take the image into Photoshop and blend multiple bracketed exposures manually or use luminosity masking techniques.
Always shoot RAW for real estate photography — without exception. RAW files contain significantly more exposure latitude, which is critical when you need to simultaneously recover blown-out windows and lift dark shadow areas in the same image. JPEGs are 8-bit with limited dynamic range — you simply cannot make the exposure corrections that real estate photography requires without artifacts when working from JPEGs. RAW is non-negotiable for professional real estate work.
A standard residential real estate gallery typically contains 25–45 edited images for a home under 3,000 square feet — covering all main rooms, key details, exterior front and back, and any special features (pool, garage, home office). Larger properties, luxury listings, or properties with extensive grounds may require 50–80 images. Always agree on the image count with your client before the shoot so expectations are set clearly.
Yes — if your presets include .DNG format files (which all Camegraphy presets do), you can install and use them in Lightroom Mobile on both iOS and Android. However, for professional client deliverables, shooting with a dedicated camera and editing on a calibrated desktop monitor is strongly recommended. Phone photography and editing is better suited to social media content and quick property previews than final MLS or listing photography.
For real estate interiors, use a wide-angle lens (16–24mm equivalent), set your aperture to f/7.1–f/11 for maximum sharpness front to back, use ISO 400–1600 depending on available light, and use a tripod to allow slower shutter speeds without blur. Always shoot in RAW format. For twilight exteriors, drop to ISO 100–400, use f/8, and allow the shutter speed to lengthen to 1–4 seconds on the tripod to capture that signature blue-hour glow.
Upgrade Your Real Estate Editing Workflow
Browse Camegraphy’s complete collection of real estate Lightroom presets — built by a working real estate photographer in the GTA, tested on hundreds of properties.
You Might Also Like
The best Lightroom presets for real estate photography transform
ordinary property shots into market-ready images that sell faster.
In this guide, we review the top Lightroom presets for real estate
photography available in 2026 — from bright interiors to dramatic
twilight exteriors.
Finding the best Lightroom presets for real estate photography saves hours of editing time on every property shoot. The best Lightroom presets for real estate photography handle the most
common challenges — blown windows, dark basements, mixed lighting, and twilight exteriors — with a single click. Whether you shoot condos, family homes, or luxury estates, the right Lightroom
presets for real estate photography will transform your workflow.
Professional photographers who use the best Lightroom presets for real estate photography consistently deliver galleries faster and win more clients. The best Lightroom presets for real estate
photography eliminate the guesswork from interior editing — giving you clean whites, balanced shadows, and natural colors on every shot. From downtown condos to luxury suburban estates,
the best Lightroom presets for real estate photography work across every property type and lighting condition.
Real estate agents and brokers consistently choose photographers who deliver the best Lightroom presets for real estate photography results. Using the best Lightroom presets for real estate photography means every listing looks bright, clean, and professional. The best Lightroom presets for real estate
photography are an investment that pays for itself on the very first shoot.
The best Lightroom presets for real estate photography include specific adjustments for every room type. Kitchens and bathrooms need the best Lightroom presets for real estate photography that emphasize cleanliness and brightness.
Exterior shots also benefit from the best Lightroom presets for real estate photography — especially twilight and drone images. The best Lightroom presets for real estate photography for exteriors enhance sky detail and facade clarity.
Every real estate photographer needs the best Lightroom presets for real estate photography in their toolkit. The best Lightroom presets for real estate photography deliver consistent results across every property and every lighting condition — saving hours on every shoot.